We have included all the steps in this post to unlock bootloader on Nokia C12 Pro. Simply, follow this guide and you will end up unlocking the bootloader successfully.
If you get bored with the stock firmware of your smartphone and want to play around with more customization, then you will need to get your device rooted. But you can’t be able to root your device before unlocking the bootloader.

What is Bootloader?
In simple words, a bootloader is a set of instructions that are executed automatically, whenever the device is turned ON. The operating system and Kernel need bootloader instructions to start the boot process and operate the recovery mode.
By default, the bootloader of every smartphone is locked. The reason behind it is very obvious as every manufacturer wants the users to stay with their default provided skin and stock ROMs.
But as we know, Android is open-source and that gives more power and benefits to users to customize their smartphones with endless possibilities. Therefore, Android also provides users an alternate route to get a chance to customize their smartphones.
This process requires many hurdles ahead. It starts with unlocking the bootloader and so on the process continues with rooting and at last, you can end up flashing the custom ROM on your device.
So, we get to know that unlocking bootloader is the permission for users to make different levels of customization from their end.
- Gaining the root access
- Allows to flash custom recovery
- Installing different custom ROMs
- This process may void the phone warranty
- The performance of your phone might also get affected
- The process might brick your phone, if anything goes wrong
- Might become a reason for disturbing the security of your smartphone
- You might also lose the data available on your phone storage.
How To Unlock Bootloader on Nokia C12 Pro?

Pre-Requisites
- You need to charge your smartphone to at least 70% or above.
- Grab the original USB cable of your smartphone.
- Make a complete back-up of your important data. Note: It will wipe all the data available on your phone storage.
- Download Nokia C12 Pro USB Drivers.
- Download ADB and Fastboot tool. Windows and MacOS
Step 1: Enable The Developer Option and OEM Unlocking
To enter the process of unlocking, you are required to enable the developer option first and then USB Debugging and OEM unlock.
- Go to Settings on your phone.
- Locate the About Phone and then tap on Build Number several times until the Developer option gets enabled.
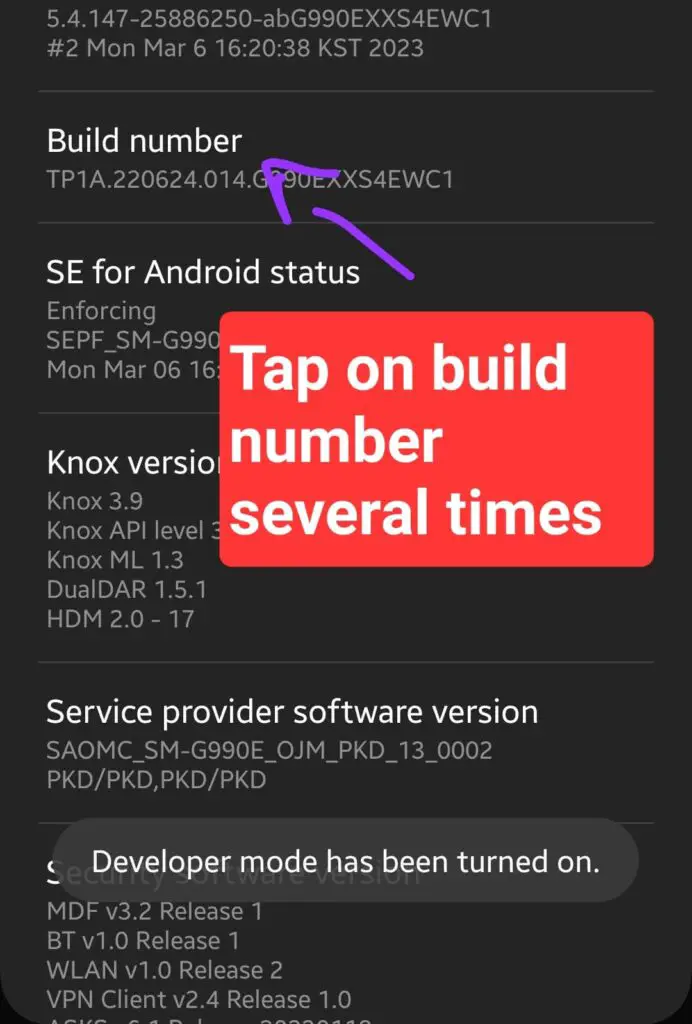
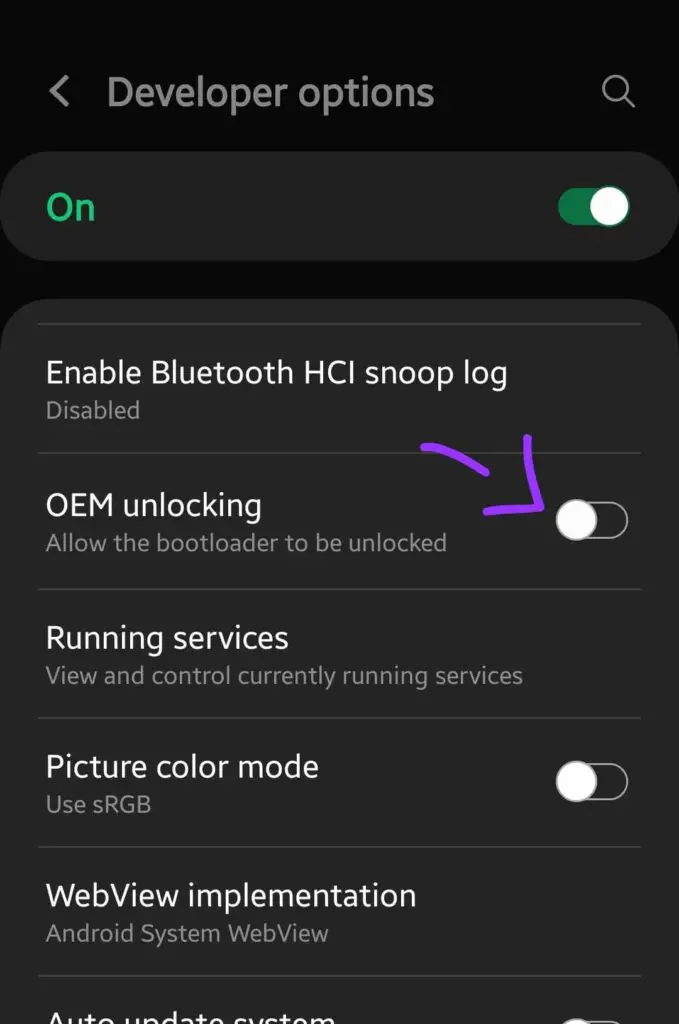
- Get back to the main Settings and then tap on Additional Settings->Developer Option.
- In the Developer options, enable OEM Unlocking.
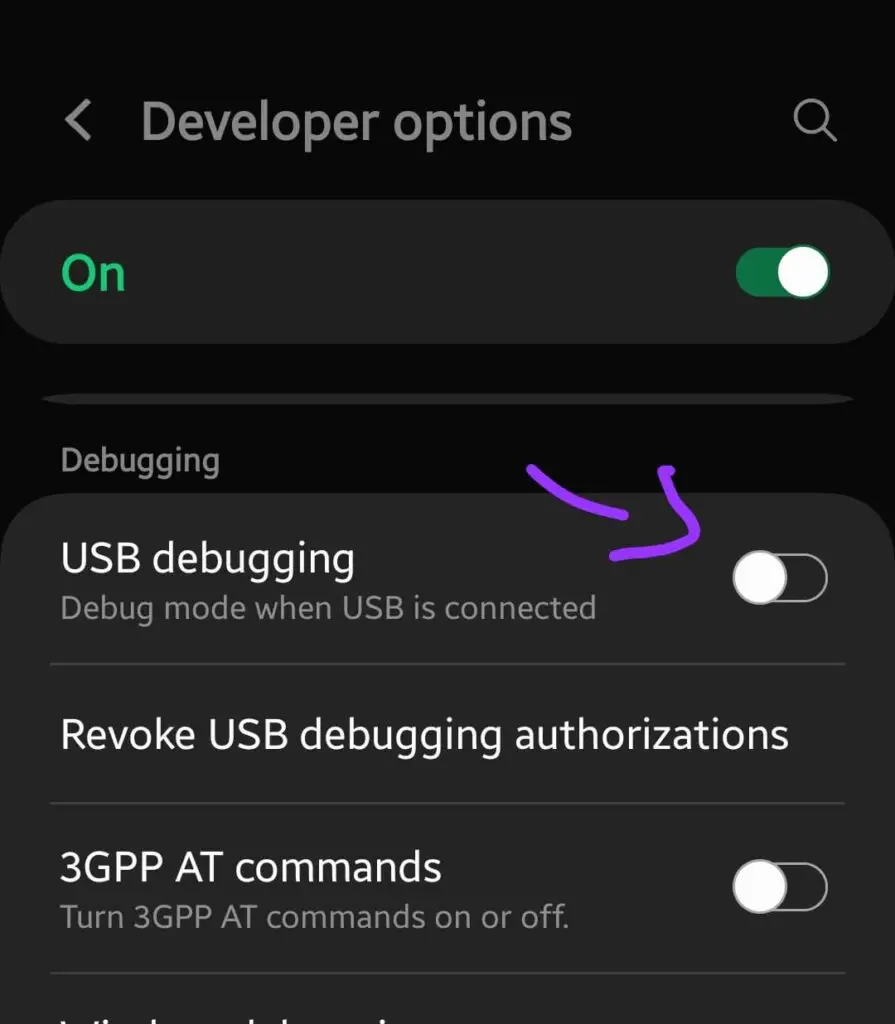
- After that, enable USB Debugging.
Step 2: Unlocking Bootloader on Nokia C12 Pro
- Download and install Nokia C12 Pro USB drivers from the above pre-requisites section.
- Turn your Phone OFF Completely.
- Boot your phone into Fastboot Mode.
- Grab the original cable of your smartphone and then connect it to your PC.
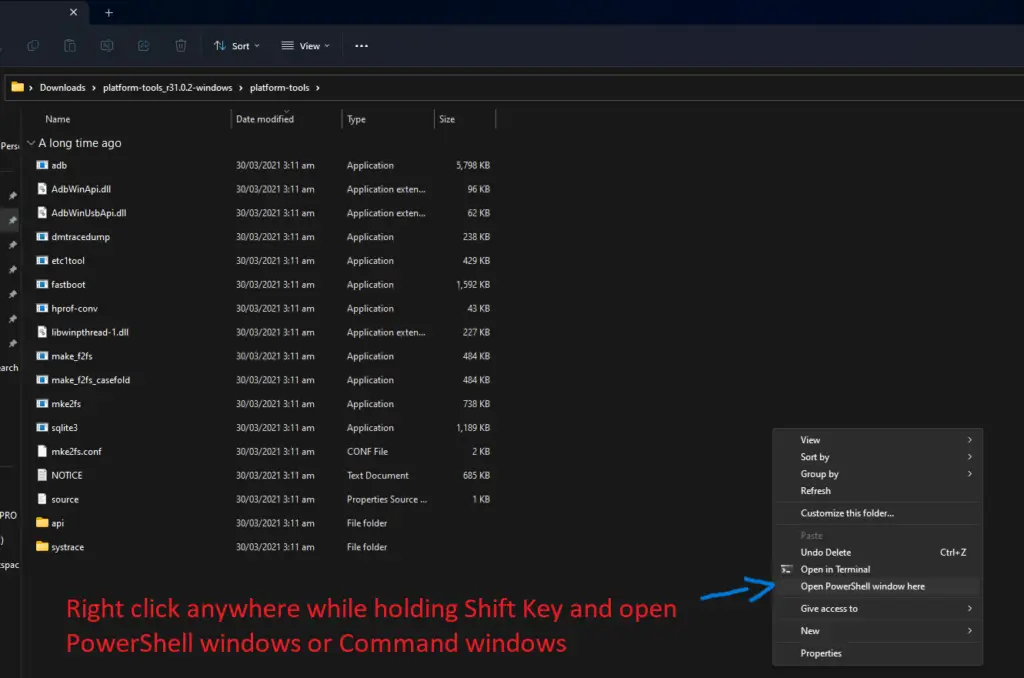
- Now, extract the ADB & Fastboot folder and right-click anywhere in the blank space while holding the shift key to open the command windows or power shell windows.
- Proceed with typing the following command to check whether your smartphone is detected by the computer successfully:
fastboot devices
After executing the above command, you will see your device ID and fastboot message on your phone screen. If that is not the case, then install the USB drivers for your smartphone and try again.
Now, type the following command to start the bootloader unlocking process.
fastboot flashing unlock
Once the above command is executed, now you will see the prompt message regarding the bootloader unlock process.
Simply, select and confirm the "Unlock The Bootloader" option by using the volume keys and power button.
After that, the process will get start and it will reboot your phone. All the data available on your phone will be erased.
Not Done Yet! The process doesn't end here, therefore avoid setting up your phone at the moment. The most important and final step [Step 3] is also required that you need to follow ahead.
Step 3: Critical Partitions Unlocking [Required]! How To Unlock?
- First of all, make sure to Turn OFF your Nokia C12 Pro.
- Now, boot your phone into Fastboot Mode.
- Connect your smartphone to your PC using the original cable.
- Open the command prompt and type the following command:
fastboot flashing unlock_critical
After the command executes successfully, you will see the prompt message again on your mobile screen.
Now, again select and confirm the option "Unlock The Bootloader" using the volume keys and power button.
It will start the unlocking process and the data will be erased. Once, the phone boots up, now you are good to go with setting up your phone from the beginning.
That's it, you have successfully unlocked the bootloader on your Nokia C12 Pro. Now, you can use the custom recovery such as TWRP to flash the custom ROMs and etc. You can also root your device and install the rooted apps on it.
If you follow the above steps carefully, you will bypass all the unlock bootloader-related errors for Nokia C12 Pro
How To Boot Nokia C12 Pro Into Fastboot Mode?
- Turn your Phone Off Completely.
- Now, Press and hold the Volume Down, and Power buttons simultaneously.
- Once, the fastboot interface appears on the screen, release all the buttons.
Now Your Phone is in Fastboot Mode!

I am a tech lover and smartphone enthusiast. I am always keen to know new things about smartphone software’s and hardware’s, So that I can provide solutions to user’s facing different problems.